
HTTP proxies
Route outbound traffic from your renders through an HTTP proxy you control.
Why use a proxy?
Section titled “Why use a proxy?”When you configure a proxy, all outbound HTTP requests made while rendering your image are routed through it. This is useful when you want to:
- Restrict access to internal content by allowlisting your proxy’s IP address on your origin.
- Control the egress IP so requests appear to come from a known location.
- Get past bot detection that rate-limits or blocks our shared infrastructure IPs.
Recommended proxy providers
Section titled “Recommended proxy providers”You can use any HTTPS proxy that’s reachable from the public internet. If you don’t already have one, these providers work well for screenshot and rendering use cases:
| Provider | Best for | Notes |
|---|---|---|
| Bright Data | Bot detection, geo-targeting | Large residential and datacenter pools. Use their Web Unlocker or Residential zones for sites with strict bot detection. |
| ZenRows | Simple anti-bot bypass | Single proxy endpoint that handles rotation, headers, and CAPTCHAs for you. Good first choice if you want something turn-key. |
| Oxylabs | Enterprise scraping | Residential, datacenter, and ISP proxies with strong geo-targeting. |
| Smartproxy | Lower-cost residential | Pay-as-you-go residential pools that are easy to set up. |
You can also point proxy_id at any internal proxy you run yourself (Squid, HAProxy, an internal corporate proxy, etc.) — anything that speaks HTTPS proxy.
Example: Bright Data
Section titled “Example: Bright Data”Bright Data gives you a host, port, username, and password per zone. In the dashboard:
- Url:
https://brd.superproxy.io - Port:
33335(or whatever your zone shows) - Authentication: enabled, with the zone’s username (e.g.
brd-customer-hl_xxxxxxxx-zone-residential) and password.
Example: ZenRows
Section titled “Example: ZenRows”ZenRows exposes a single proxy endpoint and uses your API key as the password.
- Url:
https://superproxy.zenrows.com - Port:
1338 - Authentication: enabled, with your ZenRows username and API key as the password.
Creating a proxy
Section titled “Creating a proxy”Proxies are managed in the dashboard at https://htmlcsstoimage.com/dashboard/proxies.
Click Add New Proxy and fill out the form:
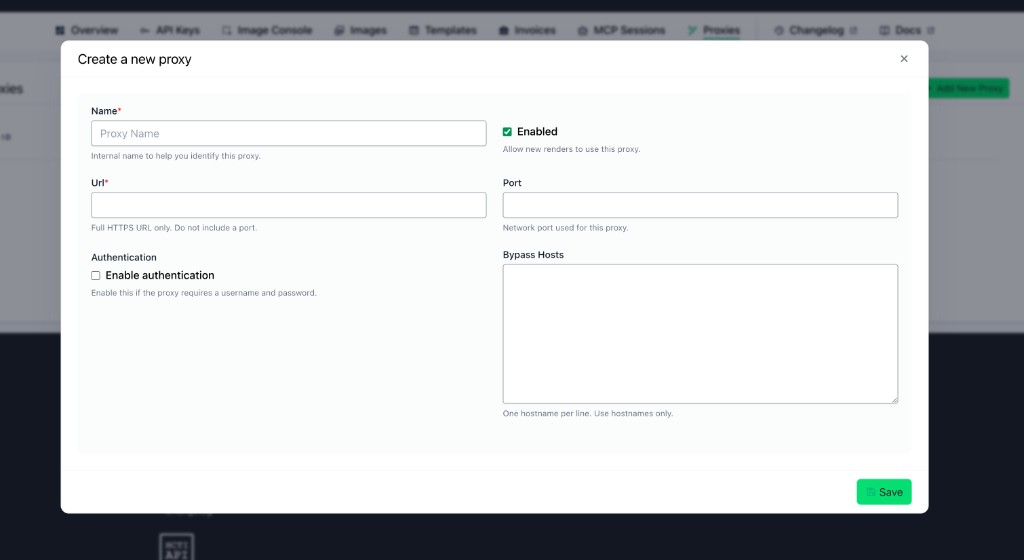
| Field | Description |
|---|---|
| Name | An internal label to help you identify this proxy. Not sent anywhere. |
| Url | The full HTTPS URL of your proxy server. Do not include a port here. |
| Port | The network port your proxy listens on. |
| Authentication | Optional. Enable this if your proxy requires a username and password. |
| Bypass Hosts | Optional. One hostname per line. Requests to these hosts will not go through the proxy and will go out direct. Useful for skipping the proxy for things like Google Fonts or your own CDN. |
| Enabled | Allows new renders to use this proxy. You can disable a proxy at any time without affecting images that have already been generated. |
After saving, the dashboard will show the proxy’s id. You’ll pass this id on each request to use the proxy.
Using a proxy when generating an image
Section titled “Using a proxy when generating an image”To route a render through one of your proxies, pass its proxy_id on the create image request.
JSON request
Section titled “JSON request”{ "url": "https://example.com", "proxy_id": "your-proxy-id"}curl -X POST https://hcti.io/v1/image \ -u 'user-id:api-key' \ -H 'Content-Type: application/json' \ -d '{ "url": "https://internal.example.com", "proxy_id": "your-proxy-id" }'HTML/CSS with a proxy
Section titled “HTML/CSS with a proxy”proxy_id works for HTML/CSS renders too. Any external assets the page loads (images, fonts, scripts) will go through the proxy unless their host is in Bypass Hosts.
{ "html": "<img src='https://internal.example.com/logo.png' />", "proxy_id": "your-proxy-id"}How it works
Section titled “How it works”- Only outbound traffic from the render is proxied. Once an image is generated, it’s served from our CDN like any other image — viewing the image URL does not go through your proxy.
- Disabling a proxy is safe. Existing images keep working. Only new renders that try to use that
proxy_idwill be rejected. - Bypass Hosts skip the proxy. Listed hostnames go out direct, which is helpful for high-volume third-party assets that don’t need to be routed through your infrastructure.
- The proxy must be reachable over the public internet from our render servers.
Troubleshooting
Section titled “Troubleshooting”- Renders fail or time out — Confirm the proxy is reachable from the public internet, the port is correct, and any IP allowlist on the proxy includes our render IPs.
- Authentication errors — Double-check the username and password in the dashboard. If your proxy requires auth, the Enable authentication checkbox must be checked.
- Some assets aren’t loading — If those hosts are listed in Bypass Hosts they will skip the proxy. Remove them from the list if you want them proxied.
proxy_idrejected — The proxy may be disabled. Re-enable it in the dashboard, or pass a differentproxy_id.
Manage proxies through API or MCP
Section titled “Manage proxies through API or MCP”Use the Proxies API or MCP tools to create, list, inspect, update, and delete proxy configurations. Management uses proxies:read, proxies:create_update, or proxies:delete; rendering with an existing proxy_id uses image permissions. API updates replace the complete configuration. To keep an existing password, include the unchanged username and authentication.retain_password: true; omitting authentication removes it.
Need help?
Talk to a human. Email support@htmlcsstoimage.com and we’ll help you get started.